How to Hang String Lights on Your Pool Cage
Install pool cage light clips and hang string lights in under 1 hour. No drilling needed with snap-on clips.
Whether you call it a pool cage, lanai, or aluminum screen enclosure, this guide covers how to hang string lights on any aluminum frame. We'll walk you through choosing the right clips, planning your layout, and completing the installation in under an hour — no drilling required with our snap-on channel clips.
What You'll Need
- Lanai Lighting Clips (1 clip on each side of every light, plus extras to manage wire between lights)
- Outdoor string lights (standard wire gauge fits all clip hooks)
- Step ladder or A-frame ladder
- For Screw Mount / Anchor clips: #10 x 3/4" self-tapping screws and a drill
Pool Cage Clip Calculator
Enter your pool cage dimensions and light spacing to get a personalized clip count. We recommend 2 clips per light bulb (one on each side), plus anchor clips every 8 feet.
Quick Reference: Common Pool Cage Sizes
| Pool Cage Size | Perimeter | Channel Clips | Anchor Clips | Total |
|---|---|---|---|---|
| Small (12' x 20') | 64 ft | 56 | 8 | 64 |
| Medium (20' x 30') | 100 ft | 87 | 13 | 100 |
| Large (20' x 40') | 120 ft | 105 | 15 | 120 |
| XL (25' x 50') | 150 ft | 131 | 19 | 150 |
Based on full perimeter run with lights every 2 ft and anchor clips every 8 ft. Round up to the nearest pack size when ordering.
Step 1: Identify Your Frame Type
Look at the aluminum frame of your pool cage. Run your finger along the horizontal bars:
- Channel groove visible? → Use the Snap-On Channel Clip (no screws needed)
- No channel groove? → Use the Screw Mount Clip
- Want extra security? → Add Anchor Clips (channel + screw hole) every 8 feet as fixed points
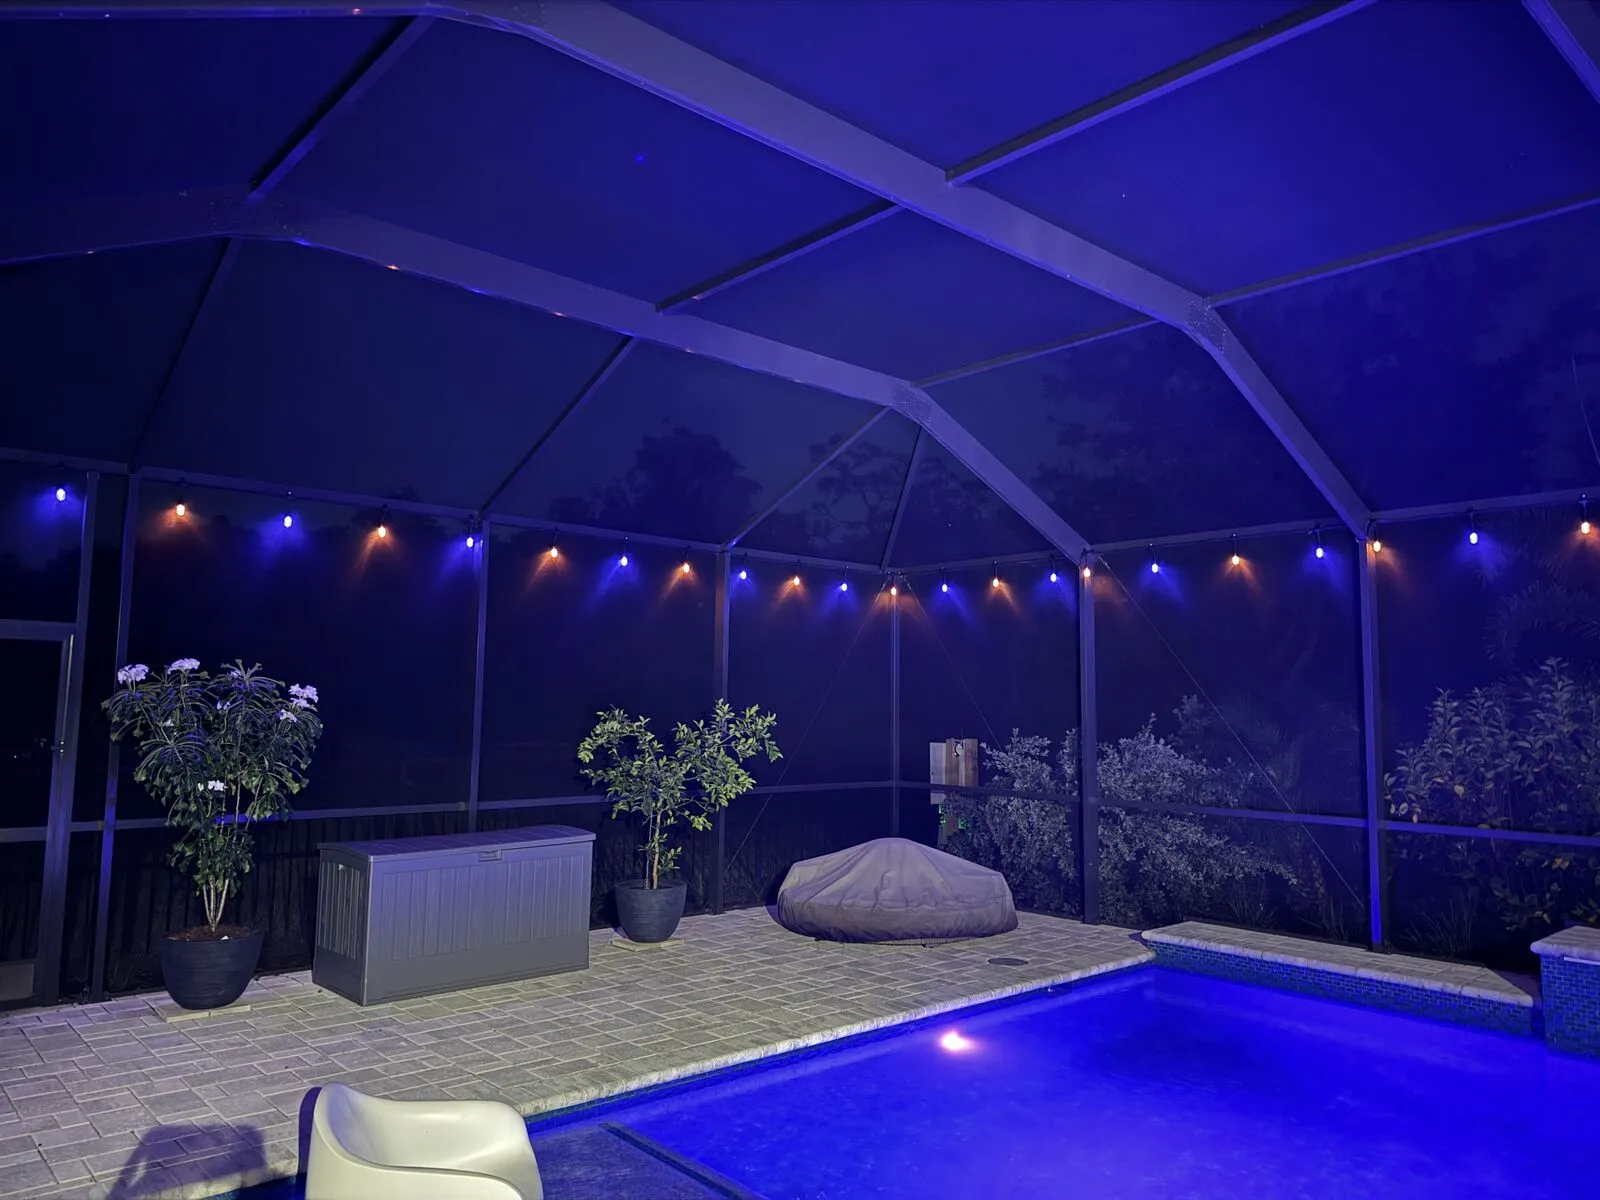
Step 2: Plan Your Light Layout
Before clipping anything, decide on your string light path. Most people run lights along the horizontal bars at about eye level or along the perimeter roofline. A few tips:
- Start near your power outlet so you know where the cord begins
- Follow the horizontal frame members for the cleanest look
- Slight droops between clips create a natural, relaxed feel
- Keep the power cord end accessible for plugging/unplugging
Step 3: Attach the Clips
For Snap-On Channel Clips:
- Hold the clip sideways and slide the tab into the channel groove in the aluminum extrusion
- Twist the clip upward so the hook opening faces up
- The clip locks into the groove — no tools needed
- The opening must face upward so the string light wire rests securely in the hook
- Place 1 clip on each side of every light bulb, then add clips between lights to neatly tie up the wire

Hold the clip with the channel tab visible

Slide the tab into the channel groove

Clip snaps into place — no tools needed

Press the string light wire into the hook
For Screw Mount Clips:
- Hold the clip against the frame where you want it
- Use a #10 x 3/4" self-tapping screw through the screw hole
- Drive the screw into the aluminum frame until snug (don't overtighten)
- The clip opening must face upward so the wire sits securely in the hook
For Anchor Clips (Channel + Screw):
- Snap the clip into the channel groove first
- Then drive a #10 screw through the screw hole for a dual hold
- Place these every 8 feet as fixed anchor points between snap-on clips

Press anchor clip into the channel groove

Clip seated — screw hole visible for extra hold

Thread the string light wire into the clip

Finished — clip and wire secure
Step 4: Hang Your Lights
- Starting from the end nearest your power outlet, loop the string light wire into each clip hook
- Let a slight droop of wire hang between clips for a natural look
- Work your way along the frame until all lights are hung
- Plug in and adjust any clips or droops as needed
Watch: Installation Videos
See the clips in action. Each video is under 15 seconds.
Snap-On Channel Clip — Slide, twist, done. No tools.
Anchor Clip (Channel + Screw) — Channel snap plus screw hole for extra security.
Quick Demo — See how fast and easy the install is.
Recommended Screws
For the Screw Mount and Anchor clips, we recommend #10 x 3/4" hex washer head self-tapping screws (100 pack, black finish). Stainless steel 410, self-drilling point — they bite directly into the aluminum frame without pre-drilling. Available at most hardware stores. The black finish matches our clips perfectly.
Care & Maintenance
- PETG clips are UV resistant and built for outdoor Florida conditions
- No maintenance required — leave them up year-round
- To remove, gently press the channel tab and pull the clip free
- Clips can be reused and repositioned as many times as needed
Why Use Clips Instead of Zip Ties or Adhesive Hooks?
Most people hanging string lights on a pool cage for the first time reach for whatever they have in the garage. Here's how the three most common methods compare in Florida's outdoor conditions:
| Method | Cost (100 ft run) | Durability | Removable? | Looks |
|---|---|---|---|---|
| Snap-On Clips | $28-$45 | Years (UV-resistant PETG) | Yes — reposition anytime | Clean, flush to frame |
| Zip Ties | $5-$10 | 3-6 months before UV cracking | No — must cut off | Visible tails, messy |
| Adhesive Hooks | $15-$25 | Weeks to months (heat failure) | Leaves residue | Bulky, visible adhesive pads |
Zip ties are cheap upfront but become brittle in Florida sun within a few months. When they snap, your lights sag or fall. You'll also need to cut them off if you ever want to adjust your layout, leaving sharp stubs on the frame. Many homeowners end up replacing zip ties two or three times a year.
Adhesive hooks (like Command strips) fail in Florida's heat and humidity. Once the temperature inside your pool cage hits 100°F+ in summer, the adhesive softens and the hooks peel off — usually taking your lights down with them. They also leave sticky residue on the aluminum that's difficult to clean.
Snap-on clips are designed specifically for aluminum screen enclosure frames. They click into the existing channel groove with no tools, no adhesive, and no damage. PETG plastic handles UV exposure, humidity, and temperature swings without degrading. You can reposition them anytime and they'll last as long as your pool cage does.
What Does a Full Pool Cage Light Installation Cost?
A complete string light setup for a standard pool cage is more affordable than most people expect. Here's a typical cost breakdown for a medium-sized enclosure (20' x 30', 100 ft perimeter):
| Item | What to Get | Cost |
|---|---|---|
| String Lights | 2 x 48 ft outdoor LED strands (96 ft total) | $25-$40 |
| Clips | 100-clip install kit (80 channel + 20 anchor) | $45 |
| Screws | #10 x 3/4" self-tapping, 100 pack | $12 |
| Outdoor Timer | Optional — auto on/off at sunset | $10-$15 |
| Total | $82-$112 | |
Compare that to hiring an electrician or handyman ($200-$500+) and you're saving significantly by doing it yourself in under an hour. The clips and screws are a one-time purchase — when you eventually need to replace your string lights, the clips stay on the frame ready to go. Not sure which string lights to buy? See our guide to the best string lights for pool cages in Florida.
Common Mistakes When Hanging Pool Cage Lights
After helping hundreds of Florida homeowners install string lights on their screen enclosures, here are the mistakes we see most often:
- Not planning the layout first. It's tempting to just start clipping, but you'll end up with an awkward cord path or lights that don't reach the outlet. Walk the perimeter and decide on your route before attaching a single clip.
- Stringing lights too tight. Leave a slight droop between clips. Tight strings put stress on the wire connections and look rigid. A gentle curve between each clip creates a relaxed, natural look.
- Skipping anchor clips. Channel clips hold well, but over time wind can shift them along the groove. Adding an anchor clip (channel + screw) every 8 feet creates fixed points that keep everything locked in place, even during storms.
- Using indoor-rated lights outdoors. Indoor string lights aren't built for Florida rain, humidity, or UV exposure. Always use lights rated for outdoor/wet locations. Look for "UL Listed for wet locations" on the packaging.
- Forgetting about the power source. Figure out where your outdoor outlet is before you start. You may need an outdoor extension cord or a weatherproof outlet box. Start your light run at the outlet end so you don't have excess cord dangling across the patio.
- Overtightening screws on anchor clips. Self-tapping screws should be snug against the aluminum frame, not cranked down. Overtightening can strip the hole in soft aluminum or crack the clip. Stop when the screw is flush and the clip doesn't wiggle.
Frequently Asked Questions
How do you hang string lights on an aluminum screen enclosure?
The easiest way is with snap-on channel clips that click directly into the aluminum extrusion groove on your screen enclosure frame. No drilling, no adhesive — just slide the clip tab into the channel and twist it into place. For frames without a channel groove, use screw mount clips with a #10 self-tapping screw. Most screen enclosure installations take under an hour with a step ladder.
How do you hang lights on a pool cage without drilling?
Use snap-on channel clips. They grip the aluminum channel groove mechanically — no drills, no screws, no adhesive. Simply slide the clip tab into the groove sideways, twist upward, and it locks in place. These no-drill clips have survived 2+ years of Florida weather and a direct hurricane hit with zero failures. For extra security at anchor points, you can add a screw through the anchor clip's screw hole every 8 feet.
What are the best clips for pool cage string lights?
For most installations, a mix of snap-on channel clips and anchor clips works best. Use snap-on clips for the majority of your run (they require no tools) and add anchor clips every 8 feet for fixed anchor points. If your frame doesn't have a channel groove, use screw mount clips. All three styles are 3D printed from PETG — UV resistant, weather resistant, and designed specifically for aluminum pool cage frames. Compare all 3 designs here.
Can you hang Christmas lights on a pool cage?
Yes! Our clips work with any standard gauge string lights, including Christmas lights (mini lights, C9 strings), Edison bulb strings, LED fairy lights, and solar string lights. The clip hook holds round wire securely without crushing it. Many customers leave their clips on the frame year-round and swap lights seasonally.
Related Articles
- Pool Cage Light Clips: Snap-On vs Screw Mount vs Adhesive — Which Is Best?
- Lanai Lighting Ideas: 7 Ways to Light Up Your Screen Enclosure
- Best String Lights for Pool Cages in Florida (2026)
Have questions? Check our FAQ or email us a photo of your frame and we'll help you pick the right clip.